
[ad_1]

This text was up to date in February 2024 with contributions from Jeb Buchman, Natalia Robert, and Lily Sawyer.
Inside architectural images is a sought-after talent; you should utilize it to create eye-catching real-estate pictures, photographs of companies, breathtaking pictures of cathedrals, and even historic documentary images. However taking pictures interiors isn’t precisely a stroll within the park. It comes with loads of challenges, together with cramped areas, low mild, and tough digital camera strategies.
Fortuitously, I’ve spent years honing my inside architectural taking pictures expertise, and on this article, I share my high suggestions to make sure success. I focus on:
- The most effective focal lengths for inside structure
- The tools merchandise that you simply completely should personal
- Straightforward methods to enhance your compositions
- Easy modifying steps for refined outcomes
- Way more!
So should you’re able to degree up your inside pictures, then let’s dive proper in.
1. If doable, put together the house
If you happen to’re photographing the inside of a home or a enterprise, I extremely advocate you set the stage by taking the time to de-clutter and open up the house. Clear all flat surfaces and flooring areas. Open all blinds and curtains. Clear any soiled dishes within the sink and put them away. You’ll want to clear the house rather more so than you’ll for your self. We get used to litter and develop into blind to it, however a little bit of litter in a photograph shall be immediately apparent.
When you’re performed, the house ought to really feel inviting, just like the form of place you may think about your self residing or working. However should you’ve completed cleansing and also you’re nonetheless not impressed, you may create these emotions in your images by including private touches.

If there’s a dinner desk, set it for 2 and place a vase of contemporary flowers within the heart. Remodel an empty breakfast nook into an awesome spot to lounge by including a newspaper, espresso cup, and a plate or bowl of sunshine (and fairly) snacks. Dangle a fluffy bathrobe on a hook subsequent to the tub.
If there’s a desk, take into account including a piece laptop computer and a guide (or three). In terms of decorations or colour palettes, you wish to both fill the house with persona to play up its uniqueness or maintain all the pieces impartial with pops of shiny colour.
2. At all times use a tripod

Everytime you shoot architectural interiors, you completely should use a tripod. That is for a couple of principal causes:
First, a tripod will stabilize your digital camera/lens setup, which dramatically reduces the opportunity of digital camera shake. Since inside pictures are typically taken at slender apertures and sluggish shutter speeds, retaining your digital camera on rock-solid help is important.
Second, should you use a tripod, it’s a lot simpler to ensure your digital camera is degree. (Whereas I focus on the significance of a degree digital camera in a while on this article, it’s a basic a part of just about all architectural images.)

Moreover, there’s no good cause not to make use of a tripod when photographing interiors. Positive, should you had been monitoring topics or needing to consistently change your place on the fly, a tripod can be a hindrance. However architectural images is sluggish and deliberate; since your subject material is buildings, you may all the time rely on it to sit down good and nonetheless whilst you arrange your digital camera, dial in varied settings, and fine-tune your composition.
Word that inside photoshoots are likely to contain little or no wind, dashing water, or rain, so you may typically get away with utilizing a less expensive tripod (although there are additionally causes to put money into an excellent sturdy mannequin, together with gear security, so be sure you select your mannequin very rigorously!).
3. Begin with pure mild
One of many benefits of architectural images, particularly inside architectural images, is that nothing strikes. You possibly can leverage this by taking part in along with your settings, particularly the shutter pace.
With the digital camera rested on a tripod, you may dial in very sluggish shutter speeds to seize all of the ambient mild, even in very darkish corners. If some lamps and lights add to the general ambiance of the room, embody them and make the most of sluggish shutter speeds and lengthy exposures.
It is very important do not forget that for interiors, it’s best to purpose for balanced lighting; in different phrases, there ought to be no overly darkish shadows or overly shiny highlights. You wish to see the element in darkish areas however not blow out the sunshine areas altogether. And take into consideration which occasions of the day finest characteristic the inside house. Early morning and late afternoon mild are very tender, although overcast days additionally produce tender mild.
Alternatively, shiny tremendous sunny days produce harsher mild, particularly round noon. Due to this fact chances are you’ll wish to take into accounts shadows produced within the inside from harsh outdoors mild. If you happen to’re creating fine-art photographs, you should utilize these shadows as inventive components, however should you’re doing industrial images, this might not be acceptable.
4. Every time doable, use a flash
Within the earlier tip, I emphasised the worth of pure mild. However whilst you ought to purpose to get as a lot pure lighting is feasible, should you shoot a room with no flash, you’ll usually get shadows scattered across the room (brought on by synthetic lighting positioned alongside partitions and at varied locations throughout the ceiling). This typically doesn’t look nice and could be tough to deal with from an publicity perspective, so I encourage you to make use of a little bit of flash. You solely want one or two speedlights or strobes, they usually’ll assist stability the publicity throughout your complete body.
Right here’s what I like to recommend:
Be sure that your flashes are mounted on separate tripods or stands (they shouldn’t be in your digital camera!), and place them a couple of toes off to the facet and a foot or so behind your digital camera. (If you happen to’re utilizing two flashes, be certain they’re on reverse sides.) Intention the flashes so that they level towards the ceiling and barely away from the room you’re taking pictures.
Set the flashes manually at half energy (a cease beneath full energy) and fireplace away. Given the angle, the sunshine from the flashes will illuminate the room not directly (i.e., bouncing off the ceilings and partitions), and also you’ll get a tender, even fill mild for the room you’re taking pictures.
I all the time encourage you to overview the ensuing picture in your digital camera’s LCD and make modifications accordingly. Look ahead to unusual shadows, too-bright partitions, darkish corners, and reflections from the flash in home windows and different glass objects.
5. When taking pictures entire rooms, don’t go too broad
Once I first began taking architectural inside pictures, I used the widest-angle lens I may get my arms on. I believed that with an ultra-wide lens, I may get extra of the room within the body – however whereas I used to be technically right, extra isn’t all the time higher. I quickly observed a excessive degree of distortion towards the sides of the body, particularly in smaller rooms, and I made up my mind that ultra-wide focal lengths (i.e., 14mm) make the edges of the body look oddly stretched and off the horizontal aircraft, even when corrected in post-production.

So I experimented with completely different focal lengths and located that an efficient focal size between 21mm and 28mm offers you a really good stability; at 25mm, you get restricted distortion and a wide-enough body to seize the character and presence of the scene.
One possibility is to seize a 24mm prime, which could be very cost-effective if you’re simply beginning out (most producers supply a high-quality 24mm lens for affordable). Alternatively, you may put money into a 24-70mm zoom – sure, it can value much more, nevertheless it’ll supply further flexibility and even let you seize some good element pictures within the 50-70mm vary. If you happen to do favor a wider perspective, you may look right into a 16-35mm zoom as an alternative.
By the way in which, should you’re in a state of affairs the place 21mm received’t seize sufficient of the scene, a panorama is all the time an possibility. Talking of which:
6. Strive panoramas for ultra-wide pictures
Panoramas are an effective way to seize a complete room, particularly should you’re utilizing an extended lens otherwise you’re coping with a cramped inside. However how are you going to create one?
Begin by establishing your digital camera vertically on the tripod. Many photographers assume it’s finest to do panoramas horizontally, however the vertical orientation will provide you with a taller picture.
Then do your finest to pivot your digital camera whereas taking a sequence of photographs. Decide your begin and finish level prematurely, and just be sure you have loads of overlap between compositions. Utilizing a tripod is important, and it’s vital that you simply rotate your digital camera on a wonderfully degree horizontal aircraft – with the pivot level being roughly the place the lens meets the digital camera). Word that, if the pivot level is simply too far ahead (i.e., someplace on the lens) or too far backward (i.e., on the physique of the digital camera), the panorama will seem distorted.
For the image beneath, the pivot level was on the physique of the digital camera, which is behind the perfect spot. In consequence, the shot has a bizarre kind of convex distortion:

7. Every time doable, attempt to shoot just one or two partitions
Newbie inside architectural photographers generally attempt to squeeze an excessive amount of into the body by together with three and even 4 partitions – however if you use this method, the shot will typically seem moderately awkward-looking (should you aren’t extraordinarily cautious with the composition, that’s).
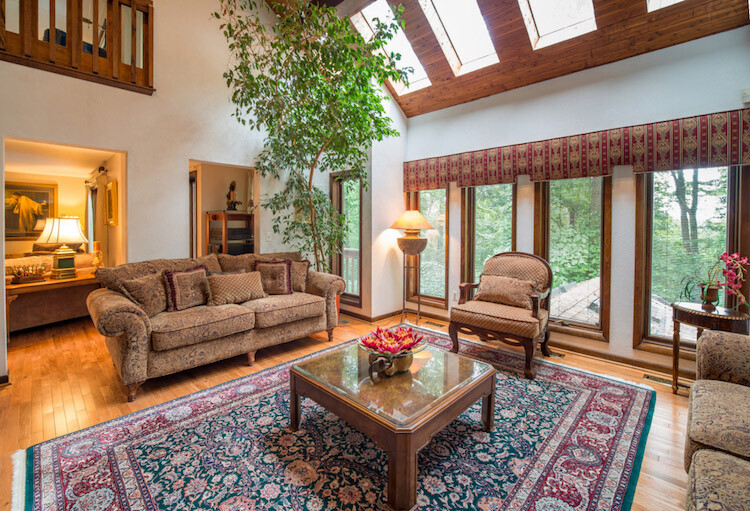
As an alternative, go for a one- or two-wall shot, which is able to give the viewer probably the most geometrically nice picture to view:

The shot displayed above is a generic two-wall scene with the partitions assembly at a typical 90-degree angle. Appears good, proper? Effectively, I additionally took a second shot, the place I backed up a number of toes to intentionally embody the third wall on the left fringe of the body:

I don’t learn about you, however to me, the third wall makes the picture look compositionally awkward and disorienting. I a lot favor the two-wall model, and I like to recommend you pay cautious consideration to the variety of partitions you incorporate into your images.
That stated, together with three partitions in a shot is usually okay, supplied that all the pieces is geometrically aligned:

8. Strike a stability
When composing your shot, focus the viewer’s consideration on the place you need it to go. If you happen to can, think about using staged objects so as to add depth and curiosity within the foreground. Keep away from flat-looking images by contrasting completely different components within the foreground, midground, and background. Keep in mind to purpose for stability, not distraction.
Utilizing the background to point out a connecting room can also be an effective way to provide the viewer a way of house. It will add curiosity and make the viewer really feel like they will visualize strolling via the constructing.

9. Be sure that your digital camera is completely degree
When taking pictures any type of structure, and particularly interiors, this can be a massive deal:
You need to work as laborious as doable to make sure your digital camera isn’t tilted up, down, left, or proper when taking pictures. Even the slightest tilt would require post-production cleanup, and also you’ll lose pixels within the course of.
Right here’s an instance of what I’m speaking about:

See how slanted the home windows are? They lean outward, which is an indication of perspective distortion. Clearly, this isn’t an correct depiction of the room; as an alternative, it’s the results of the digital camera being tilted ever-so-slightly downward.
However as soon as we get the digital camera good and degree, right here’s the outcome:

As you may see, retaining your digital camera degree makes a big distinction. Fortunately, there are a few methods that will help you get your digital camera completely straight if you compose your images. Most cameras have a built-in degree (with the built-in degree activated, if you look into the viewfinder, you’ll see strains throughout the focusing display screen that tilt when the digital camera tilts). If you happen to’re undecided whether or not your digital camera has this feature, take a peek on the guide or do a little bit of Googling.
You too can use a bubble degree that slides onto the digital camera’s sizzling shoe. (When the little bubble is centered, it means your digital camera is degree.) You should purchase one among these ranges at nearly any images retailer for just some bucks, and it’s my most well-liked resolution as a result of it tends to be extra correct than built-in digital camera ranges).

10. Get the white stability proper
That is difficult and the nemesis of many photographers. Most non-photographers are oblivious to white stability. (That is particularly apparent in marriage ceremony images the place the bride’s gown appears blue and folks’s faces register as magenta, but hardly anybody notices!)
Once I offered my home a couple of years again, the actual property brokers who boasted of nice property images despatched a photographer to my home to take some skilled photos. She arrived with a digital camera on the tripod and a flash head pointed barely upward. The lens used was very broad – I’d guess round 10mm or 14mm. When the images had been uploaded, I used to be dismayed to seek out that the pictures had been all very blue. My residence felt so chilly, and one of many causes for that was the wrong white stability.
Personally, I favor so as to add a heat really feel to all my images, so I have a tendency so as to add that in modifying. You possibly can go for a impartial look – and it could possibly assist to make use of a grey card when on website – or you may emphasize heat, however should you attempt the latter method, do watch out that the whites nonetheless look white and never yellow or cream.
Backside line: At all times do not forget that what typically attracts folks to a picture is a sense or emotion. Your picture turns into all of the extra highly effective if it reminds the viewer of a sentiment, expertise, or one thing that resonates with them. White stability is vital in serving to obtain this sort of engagement along with your viewer.
11. Rigorously edit your inside photographs
With out modifying your architectural images, the outcomes shall be lackluster. Due to this fact, I encourage you to edit every picture that you simply plan to share!
Begin by importing your images to your favourite modifying program and comply with these primary modifying steps to create extra refined outcomes. (Word that I reference Lightroom Traditional, however you may obtain the identical results in just about any editor.)
Straighten out the strains
Doing this can immediately polish up your images. If you happen to shot at a peak of roughly 5 toes from the ground and saved the digital camera degree, the quantity of straightening it’s important to right ought to be minimal. In Lightroom, you’ll find straightening choices within the Lens Corrections panel.
Fill in and even out the sunshine
Earlier than making any changes to the brightness or publicity, you’ll want to right any lens vignetting. (That is when the corners of the picture are a bit darker and is particularly widespread with wide-angle lenses.) Lightroom presents lens profiles that may routinely have in mind your lens’s optics and make computerized corrections; simply ensure that Allow Profile Corrections is checked within the Lens Corrections panel.
And should you don’t like Lightroom’s computerized changes, you may all the time head into the Handbook tab and use the sliders to attain the impact you envisioned.
As soon as your corners are corrected, use a Brush to right the publicity in shiny or darkish areas. That is your time to dodge and burn. I discover that erring on the facet of overexposure lends a extra pure really feel to the house. I like to recommend pushing the general publicity up slowly, and when it feels too shiny, begin pulling again.
You too can lighten darkish areas barely with the Shadows slider within the Fundamental panel. Nevertheless, watch out to not lighten the shadows a lot that you simply deliver out grain (noise) or that the picture appears faux.
Carry out colour corrections
Regulate the general colour temperature as wanted. If you happen to like a hotter impact, as I do, purpose for heat, not apparent yellow.
Additionally, bump up the Vibrance slider a bit as an alternative of messing with the Saturation slider. Added Saturation can shortly make a photograph look too faux, whereas Vibrance is a extra refined device that helps give the colour slightly further kick. Once more, play with the sliders on these settings; seeing what your eye is snug with will go a good distance towards honing your color-correcting expertise.

Regulate the readability and sharpness
Enhance the Readability slider, however do it slowly. Readability is an effective way to shine up a photograph with out going overboard on distinction, plus it offers the picture an general crisp look. Relying on the picture, chances are you’ll wish to concurrently play with lowering the Blacks slider a bit, too.
You may additionally wish to add a little bit of sharpening (within the Particulars panel). Watch out to not push the Quantity slider too far, nevertheless; you need a picture that appears detailed, not a picture that’s stuffed with disagreeable haloing.
Clear up the scene with cloning and therapeutic
Use your modifying program’s therapeutic instruments to take away any mud spots or different anomalies that will have gotten onto the picture.
Lightroom presents a couple of choices: Clone, Heal, and Content material-Conscious REmove. Therapeutic is a good possibility when correcting small spots, as it can have a softer mix to it, however I like to make use of the Clone device to take away any glares or reflections. You too can use it to take away handle numbers if wanted.
By the way in which, whereas I usually use Lightroom for modifying images, my private choice for cloning is Photoshop’s Stamp device. It appears to permit for extra management over the comb itself, subsequently making it simpler to clone in a manner that appears pure.
Inside architectural images suggestions: last phrases
Taking pictures interiors typically comes with difficulties, and getting good at inside images isn’t all the time straightforward.
Nevertheless, with the information I shared above plus some apply, you’ll be capturing beautiful images very quickly in any respect! Simply do not forget that it’s best to by no means rush your photographs. One of many nice issues about architectural images is that your topic won’t ever transfer, so you have got time to actually decelerate and intentionally refine every shot.
Now over to you:
Which suggestions do you propose to make use of first? Do you have got any extra recommendation for capturing beautiful inside photographs? Share your ideas within the feedback beneath!
-
GENERAL
-
PREPARATION
-
SETTINGS
-
LIGHTING
-
COMPOSITION
-
GEAR
-
ADVANCED GUIDES
-
CREATIVE TECHNIQUES
-
POST-PROCESSING
-
INSPIRATION

[ad_2]
Leave a Reply