
[ad_1]
Cameras are more and more becoming a member of our telephones and computer systems as high-tech computing gadgets. For some, this can be a cause to get nostalgic for the great outdated days of cog wheels and superb gears; for others, a cause to rejoice. Whichever group you belong to, it’s exhausting to disclaim the joy of getting new options that breathe life into your digital camera by way of a firmware replace. That is how the Nikon Z9 – and, just a few days in the past, the Z8 – received a really thrilling high-tech perform known as Auto Seize.

For a very long time, digital camera firmware was thought-about to be one thing unchangeable and set in stone without end. If one thing needed to be modified, it was solely when one thing broke. Till lately, firmware was not often the topic of passionate discussions, rumors, and hopeful anticipations.
That modified, no less than at Nikon, with the transfer to mirrorless cameras. All of the sudden, we see that updating firmware doesn’t must imply simply fixing a bug, however can enhance the performance of a digital camera in a really basic approach. The Z9 particularly has turn into an attractive demonstration of the place there’s a will, there’s a approach. There have already been three main firmware updates for this digital camera, and the newest one (firmware model 4.0 from June 2023) added an attention-grabbing Auto Seize function to the menu, which is the topic of at the moment’s article. Nikon Z8 customers simply acquired the identical firmware choice on February 6, 2024.
What Does Auto Seize Do?
The title “Auto Seize” implies a digital camera that takes footage by itself – an idea so weird that I’ll affirm your assumption: Sure, this actually is what it does. Primarily, all it’s a must to do is ready up the digital camera with sure parameters, then lie down in a hammock with a glass of mojito whereas the digital camera does its job.
I can see you shaking your head disapprovingly and pondering that that is actually a perversion of the photographic spirit, and the top of photographic laziness. I agree with that to a level. Nonetheless, there are a variety of purposes the place Auto Seize can be utilized fairly legitimately, and the place you’ll in any other case haven’t any likelihood of getting the shot you need.
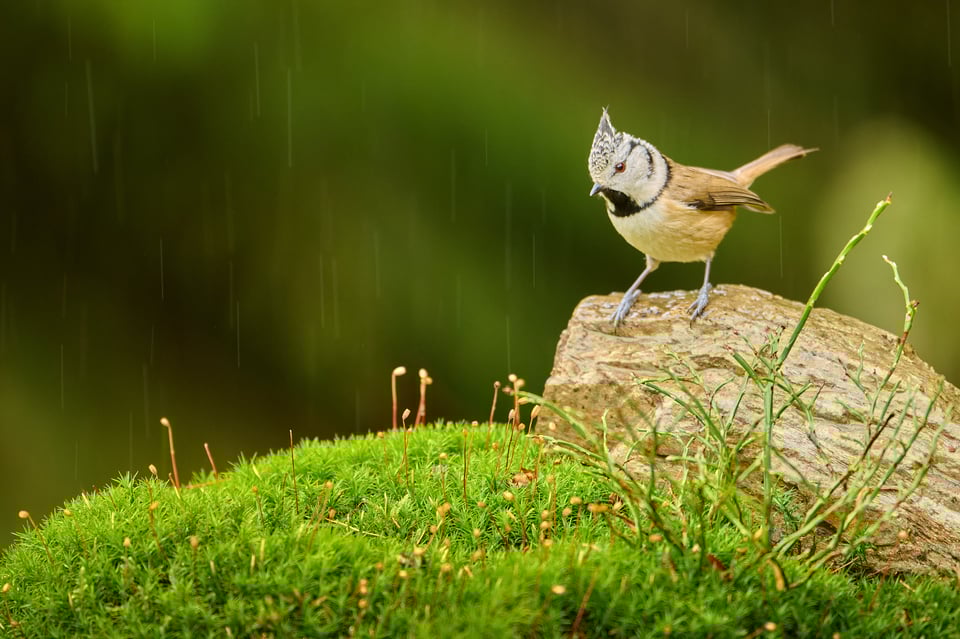
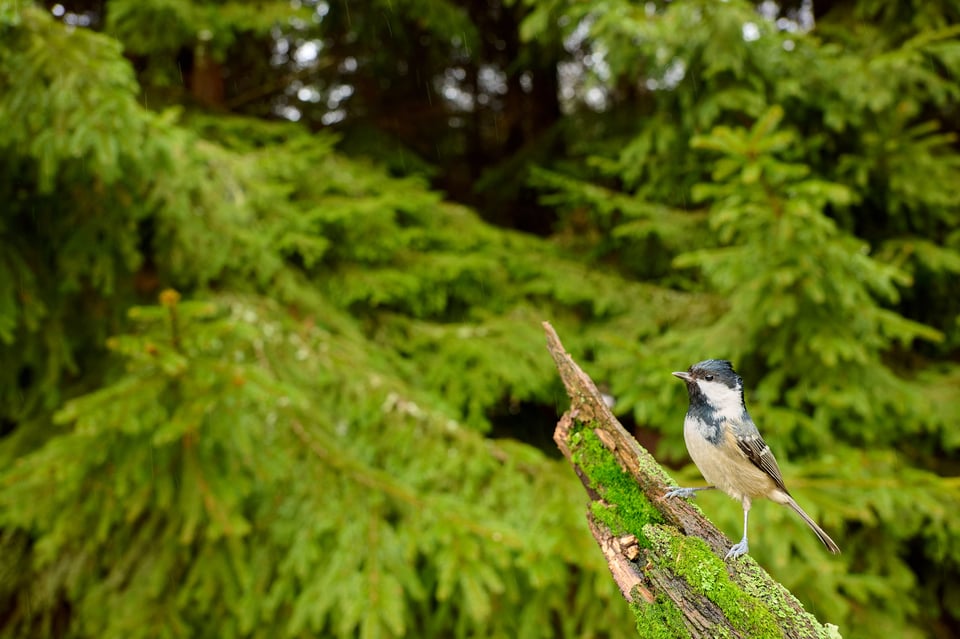
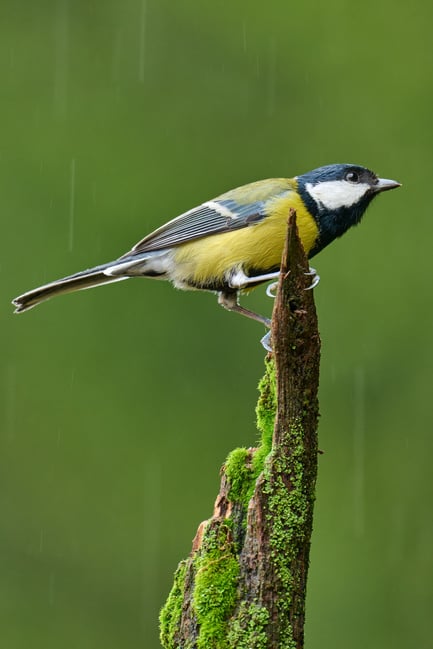
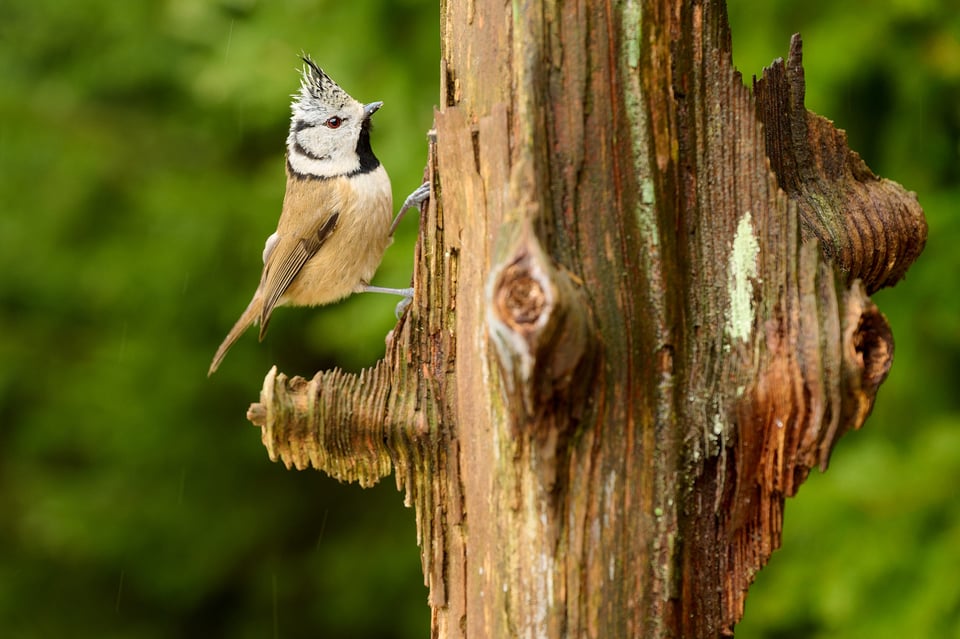
Auto Seize might be loosely considered a digital camera entice. As you’ll have seen in my interview with Vladimír Čech Jr., utilizing a digital camera entice is usually a technique to keep away from the most important impediment in wildlife pictures: the photographer! Your very presence is not going to escape the eager senses of most animals, particularly in the event you get near them with a wide-angle lens.
Auto Seize permits you to set sure parameters, and, if these parameters happen within the scene in entrance of you, the digital camera will mechanically take an image.
Setting a type of digital camera entice is what I see as the best good thing about Auto Seize. Within the spirit of Robert Capa’s philosophy (“In case your footage aren’t ok, you’re not shut sufficient”), I discover myself organising the Z9 near the place my topic is perhaps later, utilizing Auto Seize, and taking images which can be nearer than I might get every other approach.
How Auto Seize Works (and Easy methods to Set Your Digicam)
Utilizing Auto Seize is far simpler than I anticipated. Nikon has put a number of thought into the implementation of Auto Seize, and it’s surprisingly easy. Let me clarify the way it works and the way to use it your self.
First, earlier than Auto Seize, it is advisable work out your publicity values as you’ll for regular pictures. I like to recommend both Guide Mode + Auto ISO or Aperture Precedence Mode + Auto ISO – whichever you’re extra comfy with. The autofocus mode needs to be set to AF-C. Set the continual capturing price to a price that takes into consideration the animal’s agility. For a sloth, the bottom steady capturing pace will suffice; for a hummingbird, 15 FPS can be higher! Additionally, it is advisable determine whether or not you need to seize nonetheless pictures or video. I imagine that almost all of our readers are extra involved in nonetheless images, however Auto Seize does work for video, too.
Now for the settings particular to Auto Seize. You’ll discover this function because the final merchandise in Nikon’s Picture Taking pictures Menu. When you plan to make use of it commonly, I like to recommend inserting it within the My Menu tab.
Right here’s how the choices look:
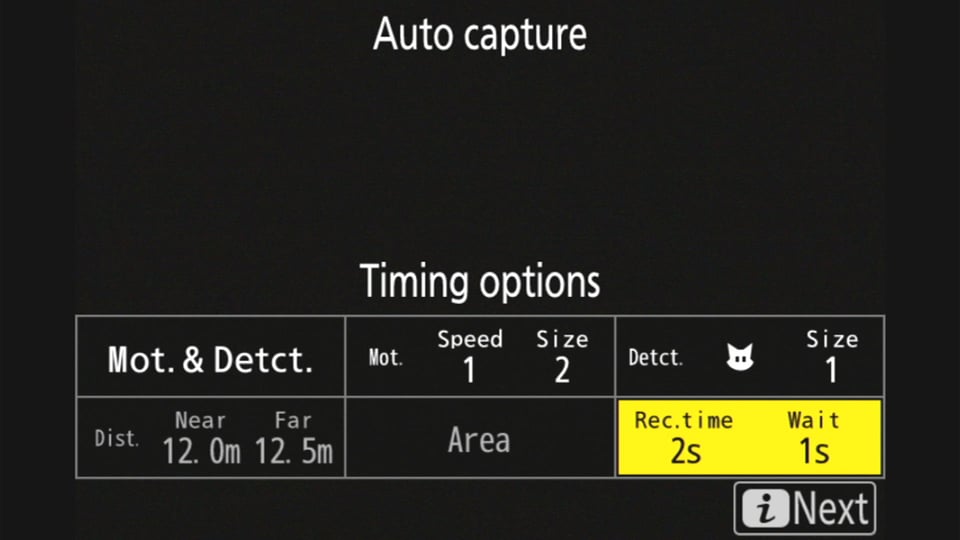
These six home windows seem as quickly as you click on “Begin” within the Auto Seize menu. The aim of a lot of the standards you enter is to restrict the variety of false triggers. When you depart every little thing on the default settings, the digital camera often received’t make a mistake, however you’ll most likely find yourself with extra work with the delete button. Nonetheless, let’s take a look at every window in additional element.
The primary window on the highest row (Seize Standards) has three checkboxes while you click on it: Movement, Topic Detection, and Distance. This determines what causes the digital camera to take a photograph within the first place. When you verify solely Movement, the shutter can be triggered on the slightest motion of a leaf or a glare on the water floor. That’s why it’s a good suggestion to additionally verify Topic Detection, which is able to set off the shutter solely when the digital camera detects the chosen topic. The final choice, Distance, permits you to restrict the digital camera to take images solely when the topic is at a specific distance.
The second window on the highest row (Movement) permits you to choose the dimensions of the topic that the digital camera ought to react to, in addition to the pace and course of the motion that may set off the following publicity. For wildlife pictures, I like to recommend leaving all settings at their default – AKA most delicate – values. Solely in case you are inundated with a bunch of images must you tighten the circumstances. You may slender it down by dimension (in order that the digital camera solely triggers if the topic is giant sufficient within the picture) or by course (to take a photograph of your topic provided that it’s transferring from left to proper, for instance).
The third field on the highest row (Topic Detection) permits you to set the kind of topic the digital camera needs to be delicate to. It stays grayed-out until you verify “Topic” within the first window. This feature allows you to slender down the themes that the digital camera detects in order that it solely takes images when your specific sort of topic is within the body. (Come to think about it, I don’t know the way to clarify that though I had Animal Detection set slightly than Individuals’s Faces, I repeatedly triggered the shutter with my very own face. I received’t take it personally.)
The primary field on the underside row (Distance) is a probably very helpful technique to give the digital camera boundaries to function inside. It received’t take a photograph until movement is detected in that exact distance vary. Nevertheless, there are two hitches to pay attention to. To begin with, tailored lenses can’t talk the space of the topic precisely sufficient (or in any respect). Because of this, I like to recommend utilizing the space just for Z lenses. The second hitch is much more limiting. The minimal distance that may be set doesn’t match the parameters of the lens used. For instance, the Nikon 180-600mm lens might be set to a minimal distance of 12 meters at 600mm, though it might focus from 2.4 meters. Because of this, I like to recommend leaving the Distance choice inactive for smaller animals.
Field #2 on the underside row (Goal Space) allows you to set the precise focus factors that the digital camera will use to detect the topic. This lets you decide precisely the place the digital camera will search for your topic and which areas it is going to ignore. This manner you may simply remove leaves or grass within the foreground and improve AF reliability. Notice that this function is simply accessible when Auto-area AF is chosen.
Lastly, the final choice on the underside row (Timing Choices) permits you to set how lengthy the digital camera will document images or video if all of the above circumstances are met. If left OFF, the digital camera will document the scene indefinitely. Alternatively, in the event you manually enter 3s, for instance, the digital camera will begin a 3-second sequence (images or video) even when the chook flies away after the primary second. The Wait After Taking pictures choice specifies how lengthy the digital camera ought to wait after the earlier sequence ends earlier than beginning the subsequent one (assuming that each one the recording circumstances proceed to be met).
Of the six choices, the final one is what is going to most likely require probably the most tuning and reconfiguration. You’ll have the digital camera set a technique as you await that once-in-a-lifetime shot of a snow leopard, whereas setting it one other approach if you end up anticipating a herd of 1000’s of wildebeest to move by.
Really, let’s study these two conditions a bit extra carefully. For the “snow leopard” events, I might set the digital camera to shoot as a lot as attainable, that means that the Timing Choices field can be set to OFF/0s, and the opposite parameters can be looser as effectively (for instance, you most likely shouldn’t limit it by the space or dimension of the topic in your body). Then again, for the “wildebeest herd” instance, I might be extra selective. Timing Choices can be set to one thing like 1s/3s, which implies: “When there’s one thing to shoot, shoot steady images for one second. Then wait three seconds, and if there’s nonetheless one thing to shoot, do one other one-second burst.”
After you’ve set the six bins as you need, the digital camera is ready up. There’s nothing left to do however affirm the choices with the “i” button, then begin Auto Seize by urgent the Video Rec button. Completed? If that’s the case, it’s time to get comfy in your hammock whilst you wait!
Auto Seize will definitely come in useful not just for wildlife photographers, but additionally for sports activities and different genres of motion pictures. Such all kinds of topics would require completely different settings. Nikon has taken this into consideration by permitting you to avoid wasting, title, and recall as much as 5 of them.
The place and Easy methods to Place the Digicam?
The actual problem when utilizing Auto Seize isn’t within the digital camera settings, however within the inventive aspect. The place must you place the digital camera to get the outcomes you need? That is the place it pays to be not solely a superb photographer, but additionally a superb observer.
Be taught the place your topic is almost definitely to be discovered, and place your digital camera accordingly. This is applicable whether or not you’re photographing birds or athletes! Perfect spots are these the place the presence of the topic might be estimated with nice accuracy, because you received’t have the flexibility to vary your composition after it’s set.
An instance can be a damaged department over the water from which a kingfisher is swooping all the way down to catch a fish. It might be a stalk of reeds the place a dragonfly is looking for or consuming its prey. It might be the three-point line the place you understand the basketball participant can be leaping at a essential second… The chances are infinite.

I additionally suggest to place some thought into the way you organize your digital camera. For instance, in the event you camouflage your digital camera, it is going to decrease the period of time it takes for animals to start out ignoring it. Additionally, take note of your tripod – I recommend splaying the legs greater than common, and perhaps weighing down the tripod with an additional bag, in order that it received’t be knocked over if a deer bumps into the lens hood! A rain cowl can also be value contemplating, particularly in the event you aren’t shut sufficient to your digital camera to convey it inside if the climate takes a flip.
Be ready for the truth that even with the massive battery of the Nikon Z9, Auto Seize mode can drain the facility in about 5 hours of capturing. After all, it will depend on many components, however no less than two batteries per day is a should. If you wish to maintain the digital camera working longer, take into account an exterior energy provide. To make use of one, simply activate the USB energy supply within the Setup menu, and join an appropriate energy financial institution by way of USB-C.
Outcomes and Abstract
On this article, I attempted to reply what Auto Seize is, when to make use of it, and the way to set it up correctly within the menu. The one factor that continues to be is my impressions of whether or not it really works effectively or not. I can be transient: The truth that I didn’t even strive it out on my Z9 till six months after its introduction is, on reflection, a disgrace. It’s a superb good instrument that Nikon has applied effectively, and I didn’t expertise any points with it throughout my testing, aside from the “Distance” choice solely working effectively with native Nikon Z lenses (and even then, not permitting the true minimal focus distance of most lenses for use).
The truth is, the Distance choice was the reason for my solely failure with Auto Seize, which is what discouraged me from utilizing it for therefore many months. On the time, I had an tailored wide-angle lens mounted on my digital camera, and I had checked all of the bins within the Seize Standards window – together with for distance. In consequence, I didn’t get a single shot of the kingfisher I used to be photographing. The digital camera stubbornly ignored its presence on a department solely about 20 cm away. So, I explored this useless finish for you and may let you know, “Not that approach, my pals! It wants a Z lens.”
Now that I’m disabling distance with my non-Z lenses, and solely enabling it with native glass, the outcomes have been way more pleasing. It doesn’t matter if I’m utilizing a wide-angle or a telephoto – in truth, the digital camera reacted immediately to any chook that appeared in its area of view. As quickly because the Z9 detected a watch, it centered on it and instantly began to shoot a pointy burst of images.
After my latest, constructive experiences with Auto Seize, my thoughts instantly began working by dozens of the way to make use of it. Another reason for me to stay up for spring in Europe and summer time in South America.
How about you, have you ever tried Auto Seize on the Z8 or Z9? If that’s the case, I’d love to listen to about it within the feedback under.
[ad_2]
Leave a Reply